Hey everyone! I haven’t posted in a while, so I decided to make a quick post 🙂
As you all should know, I have been renovating my house. I am JUST now able to start crafting again 🙂 I decided to make another mask that had a headband attached to it.
And let me tell you, it is absolutely amazing and super pretty! I wore this mask for about 8 hours straight, and it was great. I did have to adjust the headband part since I felt it was sliding, but that could be me being paranoid 😉
Anyways, watch my TikTok video to see it in action (click on the picture)! If anyone wants a tutorial, let me know and I will work on one!
Click on the image to see it in action on my TikTok video!
I have been MIA for too long! And for a good reason! We purchased a house and just moved. ALL of my stuff is in storage and will remain there for a bit while I renovate and fix up the house.
So, all that to say, I will not be crafting nor working on doll stuff, but I will be writing posts on my new blog dedicated to just house renovation.
But don’t worry, I will keep this blog up and hopefully come back after my crafting room is set up!
Hi everyone! Today I have a tutorial for a doll paperbag skirt. This skirt is by far the fastest and easiest sew ever!
The 18” doll skirt fits dolls such as American Girl dolls, My Life dolls, and Our Generation dolls.
Far Left: American Girl Doll, Middle: My Life Doll, Far Right: Our Generation Doll
The 14” doll skirt fits dolls such as Wellie Wishers, Glitter Girls, and Hearts for Hearts.
Far Left: Wellie Wisher, Middle: Glitter Girls Doll, Far Right: Hearts for Hearts Doll
Side note before we jump into the tutorial. I want to try adding drawings to my instructions, please let me know if the drawings work and are easy to follow along, or if you prefer me to do only pictures! Thank you!
Symbol Key
Alright, let’s jump right in!
I made a video tutorial to go along this blog! Let me know if this works with everyone!
GATHER MATERIALS
Woven fabric (can be done out of a fat quarter).
For 18″: 6.5″ x 28″. For 14″: 5.5″ x 16″
1/2”-1/4” wide elastic
For 18″: 10″. For 14″: 6″
DIRECTIONS (¼” Seam allowance unless stated otherwise) 1a. For the 18” dolls, I cut a 6.5” by 28” rectangle. You can play with this and make it longer (7-8”) or narrower/wider depending on how full you want the skirt (22”-36”).
If using a fat quarter, divide the width in half and add .25” seam allowance on each side for the front (so half of 28” is 14” plus .25” on each side is a total of 14.5”.)
For the 2 backs, take the remainder half measurement and divide by half again, then add .25” for one side seam only (so 14” divided by half is 7”. Add .25” side seam for a total of two 7.25” pieces.)
You should have 3 pieces, one front 6.5” x 14.5” and two backs each 6.5” x 7.25”.
Right sides together, sew each back to opposite sides of the front to have one long 6.5” x 28” rectangle.
1b. For 14” dolls, I cut a 5.5” by 16” rectangle. Again, you can play with this and cut out 6-7 inches long or wider/narrower (14”-20”).
2. Serge or zig-zag finish both top and bottom edges.
3. Wrong sides together, fold and iron bottom hem ¼” and sew close to raw edge.
4. Wrong sides together, fold and iron top waist hem down 1”
5. Sew close to raw edge.
6. Sew ½” down from folded edge to create a casing (the casing is in between both stitch lines.)
7. Insert elastic into casing, sewing elastic down on each end. – For 18 inch, elastic is 10” – For 14 inch, elastic is 6”
8. With right sides together, sew back seam and serge/zig-zag raw edges.
You are done! If you need better explanations, or a drawing didn’t work for you, please let me know so I can fix it and help you further!
Please don’t forget to share and tag me on instagram @uniquely_picturesque! Sharing is the only way to guarantee everyone has access to this great resource.
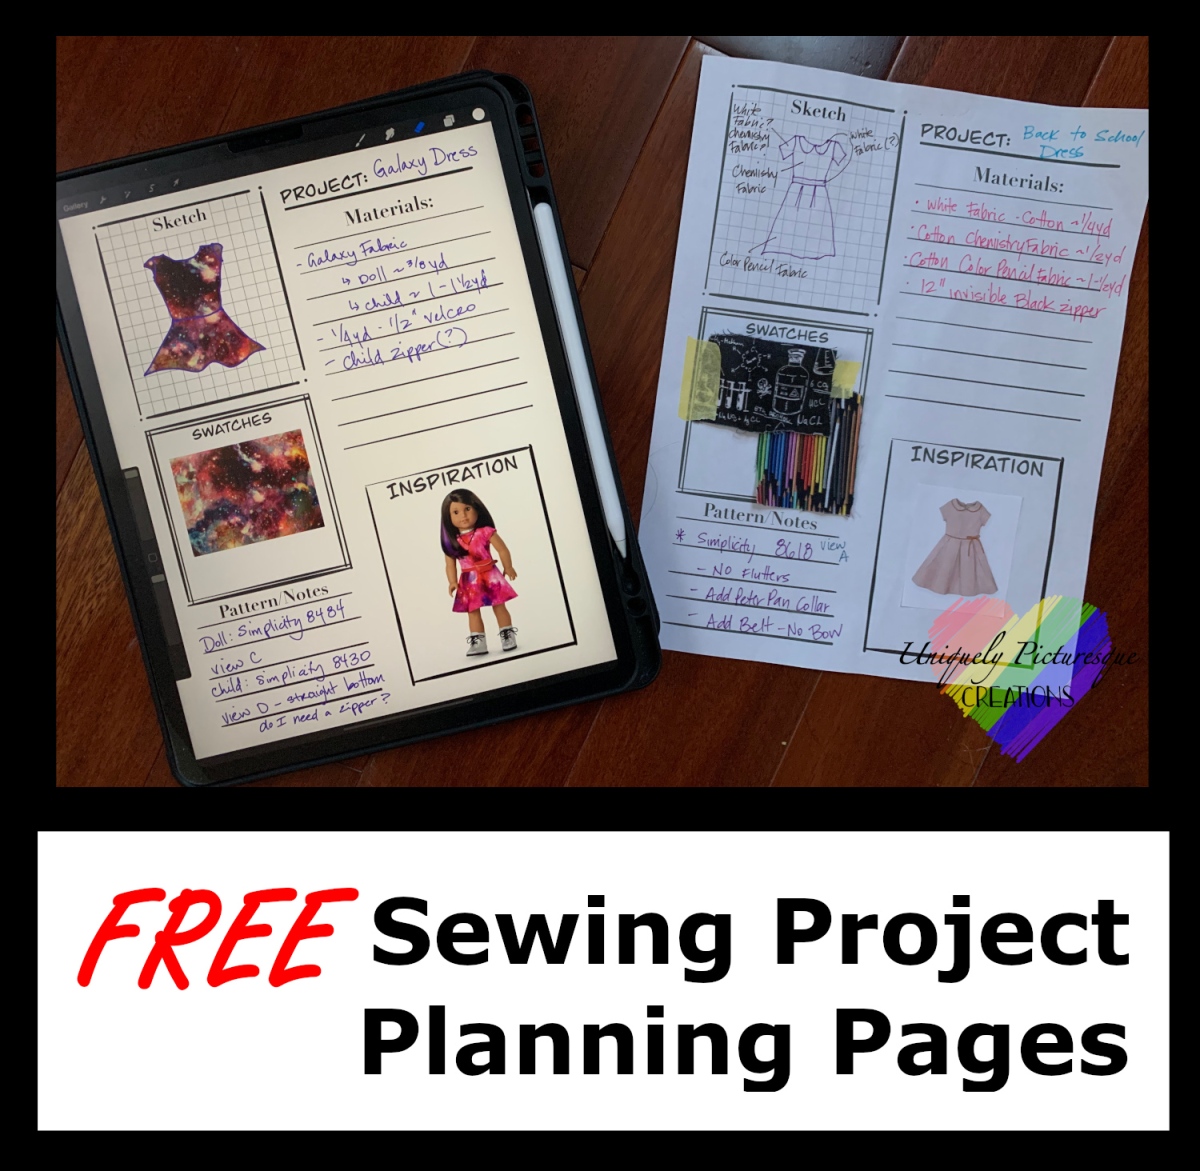
Hi everyone!! If you are anything like me, you probably have all these amazing ideas written down and scattered all over the place. Currently I have 3 notebooks and my Notes app on my phone/iPad. Oops.
I decided I needed a new system 🙂 Upon some research, I found planner pages, and what better to help you plan your sewing projects than with planner sheets!
I made these sheets to help me organize my projects, these may be a great starting point for you or these may be everything you need! I use these planner pages as just that, a place to plan and jot down my ideas. I can then grab one when I’m ready to work on that project and collect my materials and develop the project further if need be.
The great thing about these sheets? You can use them on your iPad or print them out and put them in a binder! They are 8.5″ x 11″, so just make sure to print at 100%.
OK! Ready to see them in action? I know I am!!
I used my planner page for our Back to School Dresses. There is a space for project title and materials needed (my rough estimate of what I need). There is also a spot for a sketch of what I want. Can’t sketch? That’s ok! Scribble and annotate as needed! This is for YOU! You do what works best for you. I also included a spot for fabric swatches and inspiration pictures! I love being able to cut up small squares and taping them down. I also print out inspiration pictures to glue down! And lastly, there is a small section for pattern names (if using one) and/or any additional notes I may have (such as “View A without the flutter”. I also included a second sheet, in case you needed more space to doodle and write 🙂
After I write down all my thoughts, pattern, alterations, and fabric, I am able to start sewing! I can cut and sew my fabric accordingly and create something magnificent!
The sheets work the same way for the iPad (or computer). I use Procreate on my iPad, but any drawing/editing app should work! On Procreate, start a new project with a photo. Chose the JPG file from the location you saved it on. I like using layers, to make sure I can move and scale and alter my ideas as needed. I usually end up with one layer per block (more if I have several fabric swatches). You can type or write any ideas down!
You can always keep your digital copy on your device, or you can print it out and file away! Both work very well!
I hope this helps you! Ready to download the pages? Please do not share/sell/modify these pages. These are for personal use. Want to share? Share my blog instead of pages 🙂 Thank you!
Hey everyone! Super sorry for being M.I.A these past couple of months. I was prepared to post several times but for one reason of another I never got it done. But don’t worry! Today I am sharing with you my latest creation!
Dia de los Muertos is celebrated primarily in Mexico, Central American, South America, and the United States. It is a celebration and a remembrance for the loved ones that have passed. Typically there are ofrendas (altars) with photographs of deceased loved ones, their favorite food and beverages, sweet breads, calaveras (decorated skulls often referred to as sugar skulls), marigolds, religious statues, and papel picado (perforated paper banner). There are also parades with people dressed up in colorful wardrobes, faces painted to look like calaveras, and music (especially Mariachi music!).
So, as my family prepares our own ofrendas, I decided to dress up the dolls and have them celebrate with us!
The 18 inch American Girl dolls have their own Mariachi suit on! I used this 18″ doll Charro Suit pattern by Crafty Lil Turkey (there is also one for Wellie Wishers).
This is everything (plus a skirt pattern) that comes in the Crafty Lil Turkey pattern.
Let me just tell you, I LOVED this pattern. It is outrageously easy to follow. The only thing I did not like was that it didn’t include a shirt. I ended up using the shirt from the Simplicity 8111 pattern but you can use any button down shirt pattern you have. I also didn’t like the look of the 1″ ribbon bow and decided to make a larger bow. I ended up using a 1 ½” satin ribbon and it looks perfect!
Shirt from Simplicity 8111. It fits my new AG dolls perfectly but the sleeve cuff is a little tight for the older doll.
I made both the pants version and skirt version. They both fit so perfectly and I didn’t have to alter either one! Yay! We love when that happens 🙂 It fit both my newer AG dolls and my older Pre-Mattel ones. It was however too big on My Life dolls, I didn’t bother taking a picture though, I would have to do many alterations for it to fit.
Left is Pre-Mattel doll, the right is newer doll.
For the fabric, I cut up an old suit jacket I had. This really helped with the drape and look of the finished suit. I was able to make two full outfits with one jacket 🙂 Want to make a suit but don’t have an old jacket? Go to the thrift store! There are plenty there for a relatively cheap price.
I took some creative freedom with the Wellie Wisher outfit. I decided to do this Boho Peasant Blouse from Happy Bankky. It is a quick sew and it looks great! I tucked in the shirt into the skirt and used the 1″ bow from the 18″ Charro Suit pattern. I think it looks cute, very chic 😀
Of course, because it is a Dia de los Muertos celebration, I had to make the dolls their own calavera masks 🙂
I used white felt from Walmart and puffy paints. You can use whatever you have. Do all the decorations in felt, fabric markers, fabric paint, or heat transfer vinyl. You can also just print out the face mask in cardstock!
The best part? I am providing three versions for free: colored in, line work for you to color in, and blank for you to decorate however you want!
For my masks, I printed out the line work version. I used my small light table and placed a white felt sheet on top of the print-out. I taped both down to make sure they didn’t move. I was able to see enough of the outline to color in using my puffy paints.
I think it came out great! After you have decorated your mask, just add string or elastic through the side holes 🙂
My next challenge? Find a sombrero (hat)!
They got tired of their jackets. It was a hot day. They finished playing! Time to relax 🙂
Hope you enjoyed today’s post! Please share all your creations! You can also tag me on instagram @uniquely_picturesque.
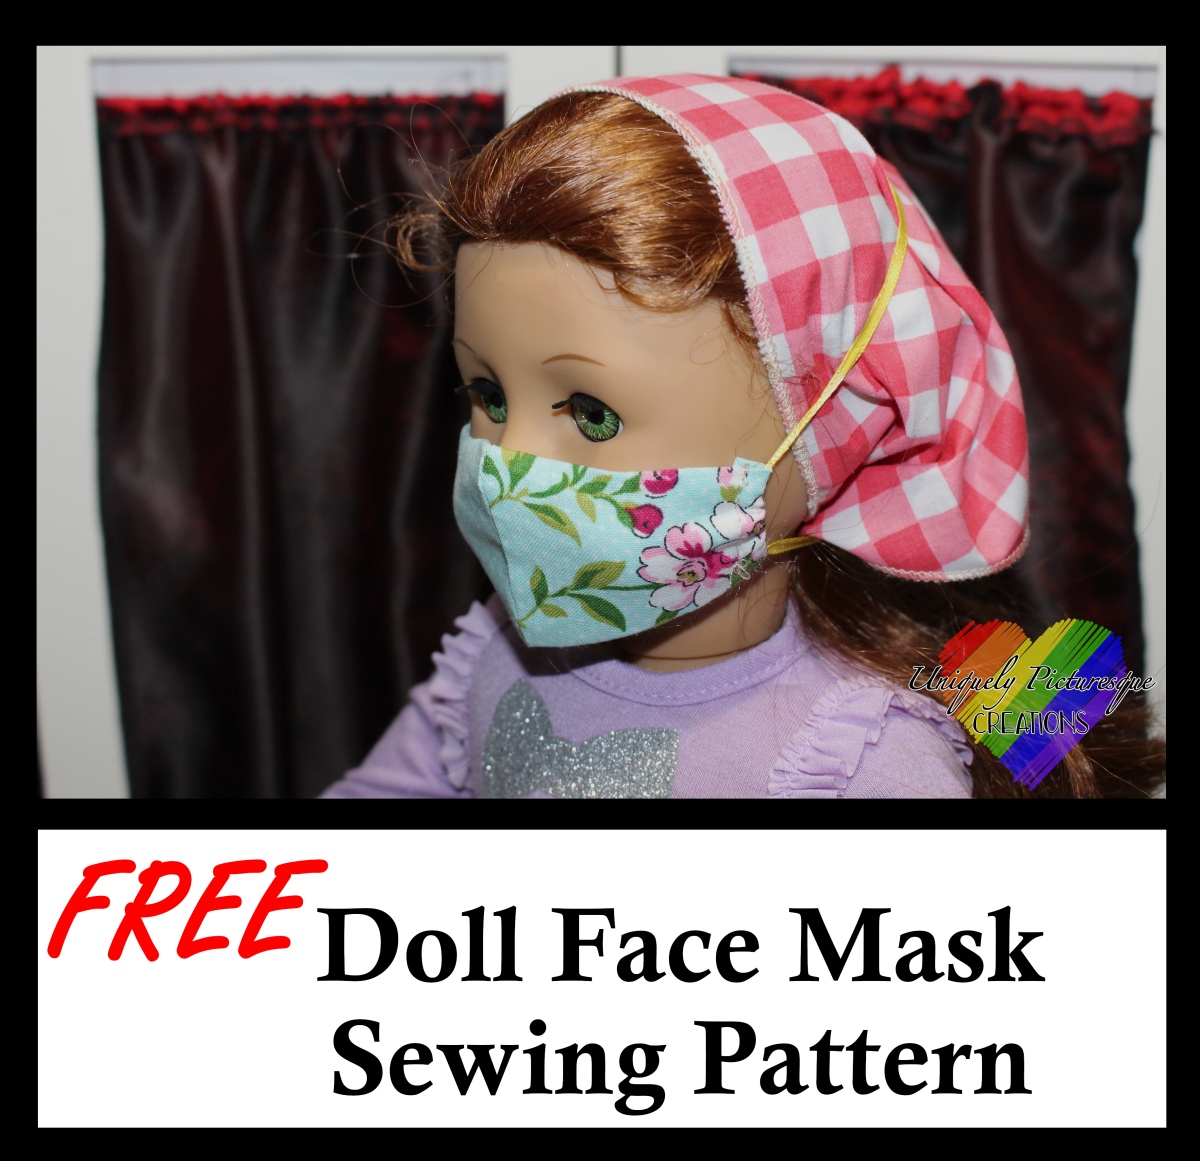
Learn how to sew a doll-sized face mask with this FREE pattern.
Hi Everyone!
UPDATE 08/15/2020: It seems the pattern from Requiem Art Designs is no longer free, but it is still for sale. You can still follow the link to purchase that pattern or see the following for some free alternatives I have found 🙂 I am working on a Dolly and Me pleated face mask post. Hopefully I can get it up this week, so keep tuned!
UPDATE 05/18/2021: I just checked again, and this pattern is free with the code on the website! When you follow the link, you will be giving a code at the top of the “Freebies” page. Make sure to input that code to get this pattern free!
I have been wanting to showcase and share some free doll patterns I have found online. With everything that is going on right now, we all need a little bit of relaxation and happy zone time 🙂
The first pattern I am showcasing is by Requiem Art Designs. It is a free pattern for a doll-sized face mask! There are several sizes available, but I only did the 18” doll size one.
Get the free pattern HERE (this pattern is free with the code provided HERE !)
GATHER MATERIALS
Print and cut the pattern out – make sure to print the pattern at 100% scale.
¼ yard or less of woven fabric – either the same fabric or coordinating fabric for the outer shell and liner. I used a beautiful cotton woven print for the outer shell and a white satin for the liner.
18” length string or embroidery floss – I used a 1/8” wide ribbon
Optional: Bendable wire for the nose clip. I used a bread tie 🙂
SEWING
Follow the directions on the pattern. Trace/pin the pattern on the fabric. Ensure to cut the outer shell and liner pattern on the correct fabric (if using different fabrics).
NOTE: The pattern has a 1/8” hem allowance, if you need a larger allowance, now is the time to add that.
Sew both outer shell and liner pieces together along the curved side – right sides facing each other. I don’t have pinking shears, so I left the edges as is.
I placed and sewed the bread tie about 1/4” from the top edge. I made sure to leave enough allowance to sew 1/8” seam.
Pin liner onto outer shell on top edge– right sides facing each other – making sure to match center seam to center seam. Sew 1/8” seam, ensure not to sew through the bread tie/nose clip.
Pin and sew liner onto outer shell on the bottom edge. NOTE: the outer shell is larger than the liner, so the outer shell will be bunch up a bit. This is OK
Turn the mask right side out. YAY! You almost there! I am not one to iron all the time, but this is vital to this step. Iron side raw edges 1/8” and then again about 3/8” (where the liner piece ends ensuring to cover the liner raw edge with the folded over outer shell). Sew 1/4” from the edges. This should ensure you have enough space for the 1/8” ribbon (or whatever you use for tie).
I gently pushed the string though the openings. It worked best if I gently pushed the sides in to make the channels open up.
You are done! I tied the string first before putting the mask on the doll. You can do it afterwards. If you tie the string first, place the bottom string over the doll, adjust the mask as needed and pull the top string out and over the head. Now you should have a tie by the dolls neck and another towards the top of the head.
I tried the face mask on both an American Girl doll – my model here is Felicity – and a My Life doll – renamed Lainie Doll. While I like the mask better on the AG doll, it looks good on both. It does seem like it was shorter on the My Life doll, I would like it to come further down on the dolls chin, but that is a personal preference.
Hi Everyone!! I was sewing some knit shorts for my kids and decided the dolls needed some as well!! Aren’t these so cute?!?!
I found a few free patterns for the 18 inch doll leggings, but none of them were for shorts, and I wasn’t very happy with the fit (especially the back.) So, of course, I had to make my own pattern 🙂
And because the big dollies had shorts, the Wellie Wishers also needed some 🙂 I am happy to say all three patterns are free!! The only pattern that is mine, is the American Girl size pattern.
The Wellie Wisher leggings are from Wren Feathers. You will have to alter the pattern to make them into shorts, but don’t worry, I will tell you how 🙂 Get the Wellie Wishers pattern HERE. The kids patterns is from 5 out of 4 pattern company. The Little Ninja pattern comes in multiple sizes, from 0-3 months to 14. It is a great pattern with great instructions 🙂 Find the pattern HERE. And if you are REALLLY feeling adventurous, you can make yourself a pair too!! Find the adult Ninja Leggings pattern HERE (it is also free.)
OK so good part! Let’s get the sewing for the dolls started!!
GATHER MATERIALS (Materials are for Doll Sizes only.)
Fat Quarter Knit Fabric
¼” -¾” elastic – For the Wellie Wisher, 6″ of ¼” wide elastic. For 18 inch dolls, 10″-10.5″ of ¼ -¾” wide elastic (if using casing method, use ¼-½”. SEE DIRECTIONS)
Tools:
Walking Sewing Foot
Twin Needle or Knit/Jersey Needle – I use a twin needle. It was the best investment ever.
Optional: Serger/Overlock Machine – Although it is not necessary, it is really easy to sew knits with one.
Optional: Rotary Cutter
DIRECTIONS – Follow for both doll sizes and lengths.
Print and cut pattern. Make sure to print at 100% scale. For the 18 inch doll leggings, there are 3 lengths: bermuda (fit above the knee), capri (fit below the knee), and pant. Cut according to desired length. Seams are as noted.
For the Wellie Wishers, you will have to alter the pattern a little bit. For bermuda length, cut pattern 3-¼” from bottom hem. For capri length, cut pattern 2″ from bottom hem. Seams are ¼” except for 1/2″ elastic casing.
2. Cut 2 mirrored pieces. The easiest way to cut, is folding the fabric in half and cutting through both fabric pieces using a rotary cutter.
3. With right sides together, sew front seam using a serger or straight stitch. Repeat for back seam. (Note: If using a serger, there is no need to stitch with a sewing machine, the serged edge will be enough.)
4. Fold and iron bottom hem. Stitch using a twin needle or a stretch stitch. (Check your sewing machine manual for stitches or use a simple zig-zag stitch.)
5. Open pants so crotch seams line up. Pin along leg opening. Sew with a straight stitch or serge along leg opening.
6. Fold down and iron waist at casing seam allowance – for 18 inch dolls it is ¾” for Wellie Wishers it is ½”. There are two ways to make the elastic waist: 1) you can make a casing (continue to step 7), 2) zig-zag/serge the elastic to the fabric (skip to step 10.)
The pink shorts have an elastic casing. The stained glass shorts have a serged elastic that is folded down and sewed.
7. For the casing, sew using a twin needle or stretch stitch. Make sure to leave enough room for the elastic, for Wellie Wisher sew about ⅜” from the top, for 18 inch dolls sew ⅝” from top. SIDE NOTE: Using this method, you can only use ¼” or ½” wide elastic for the 18 inch dolls.
8. Leave about 1″ gap opening in the back to feed elastic through. Use a safety pin to help guide the elastic through. Make sure to not let the other end of the elastic slip into the casing (you can pin that end down!)
9. Overlap the elastic by ½” and sew a zig-zag stitch. Let the elastic go back into the casing and sew the gap close. You are done!
10. My preferred method for 1/2″ and wider elastic is to zig-zag/serge the elastic. Overlap the elastic by ½” and sew a zig-zag stitch to form a loop.
11. Pin the elastic at quarter points, do the same for the waist on the fabric. Line up at the quarter points and waistline fold, pin the elastic to the fabric.
I forgot to line-up the elastic at the iron line 😦
12. Using a zig-zag stitch or serger, sew the elastic to the fabric. Make sure to pull the elastic as you sew without pulling the fabric.
13. Fold over the elastic and sew using a twin needle or a stretch stitch. You are done!! Yay!
See how easy that was? Now go and sew some doll leggings! And some for yourself or child 😉
Wellie Wisher and American Girl Doll shorts!
Don’t they just look cute??
Wellie Wisher and American Girl Doll Capri Pants
I absolutely loved this fabric! I was able to find all three fabrics at Joann Fabrics. I usually wait until there are sales and go through the remnants section 😀
Wellie Wishers and American Girl Doll leggings 🙂
I don’t know which one was my favorite! My kids loved them all and loved the fact they are able to match with their dolls 🙂
I want to take some time now and thank everyone for reading my blog! Thank you for embarking on this extraordinary blogging adventure with me! If you have enjoyed my blog and free content, please consider donating to me.
As I continue to develop and grow my blog, and provide free content, I have come to the realization that I need to upgrade my website hosting plan. All donations will be used for blogging expenses and to allow me to provide free content to all of you. Thank you!
Hi Everyone!! Over 2 weeks ago, I decided I wanted to make a graduation gown for the American Girl Dolls. I searched and looked for a gown. Not finding what I wanted, I decided to design one myself. Of course I needed a cap too. But because I love being extra sometimes, I needed to decorate that cap 😀
And along came Uniquely Picturesque Creations’ second official pattern! And for the time being the pattern will be a free download!!! All I ask is that you donate to an organization that fights for racial justice and social justice (not sure which one? I provide a list at the end of the post 🙂 )
When I set out to design the pattern, I wanted the doll gown to resemble a real graduation gown. Like a real gown, the front is a v-neck with pleats, the sleeves and back have gathers, and the sleeves are wide and end at a point! The best part is you can make this pattern with either a velcro or zipper closure. I only had velcro on hand, so that is what I show, but it is easy to use a zipper instead.
The cap was the trickier part. I spent most of a week designing and redesigning the cap. Finally I am happy with the outcome! I wanted to make sure the cap fit 11″ doll heads (typical for 18″ and American Girl Dolls), that it resembled a real cap with a pointed large front panel, and an elastic back. Seeing as elastic is scarce right now, you can make the cap without elastic! (More info below.) And because you can’t have a cap without a tassel, I am including instructions on how to make a tassel!
Lastly, the best part (but really, it’s all pretty great :D), I wanted to put a design on the cap. The only cap I decorated was my college graduation cap. At the time, it wasn’t very common to see decorated caps, and only the Architecture majors at our school had the honor and custom of doing this. Seeing as we were Architecture majors, we went all out making 3D buildings out of paper, foam board, balsa wood, and anything that we could get our hands on. I decided to make a 3D Mesoamerican pyramid out of foam board. Sadly, I don’t have it anymore and I don’t have many pictures.
N0w, it is becoming more and more common for High School and College students to decorate their caps! So, why not our dolls?! Although we are in quarantine, and not many graduates are having a traditional graduation nor ceremony, we can still decorate the caps and have fun with it!
I am including the design for free as a jpeg, SVG and Silhouette Studio file (for those with a Cricut, Silhouette Cameo, etc), and a PDF file. Please, enjoy the file but do no sell, alter to sell, nor share the file with others. Instead, share this post with them! The file will always be free 🙂
Ok, enough story, now to the good part, the instructions!
GATHER MATERIALS
Pattern: Make sure to print at 100% scale and the 1″ square measures correctly when printed. Don’t forget to donate to an organization fighting for racial justice!
1/2 yard Woven Fabric – This can be any solid color you want, either traditional white and black, or school colors (I graduated in yellow from 8th grade – ugh).
6-7″ Velcro or Separating Zipper – I used 6 inches of ¼” velcro, but you can use ¼” – ½” wide velcro.
For cap:
10″ x 10″ of Woven Fabric – This can be the same color as the gown, or a matching color.
6″ x 6″ cardboard – I cut up a cardboard box.
Embroidery Floss – You can also use twine, yarn, etc. This can either be one color, or multiple colors.
⅞”-1″ Button – This can be a flat button or a shank button. I wouldn’t recommend using a dome button.
3″ of 1/4″ Elastic – If you cannot find elastic, you may need to use a different hem allowance on cap headband (see cap constructions.)
Small pocket sized notebook (around 3.5 inches wide such as a Moleskine) – It’s not necessary but definitely easier if you have one.
Optional: Fiber Fill for button
Optional: Tassel charm
Tools:
Fabric Cutting Scissors/Rotary Cutter
Marking Tool – This can be chalk, erasable ink, or a pencil like me 😀
After cutting out pattern pieces, tape Pattern piece A to piece B. Tape Pattern piece C to piece D.
Trace and cut fabric. Mark sleeve gathering dots, pay attention to the front and back of the sleeves. Mark pleats on front gown, pleats go away from center, mark left and right pieces accordingly.
Right sides together, sew main fabric front yoke and back yoke at shoulder seams. Repeat for lining fabric. Press seams open.
Right sides together, sew main yoke and lining around neck opening. Clip around curves and/or use pinking shears (yes, I finally bought some and am using them ALL THE TIME.)
Turn yoke inside out and iron. Optional (I didn’t simply because I don’t like the look) you can top-stitch around neck opening. Set aside.
Make pleats on front pieces. Please note, each pleat consists of 2 solid lines with a dashed line in between.
Working from center seam to side seam, with fabric right side up, fold fabric at first dotted line so right sides are touching, (both solid lines should be touching) iron ⅓ of the way down.
Fold fabric back at top line marking so right side is facing up again (both solid lines are still touching), iron 1/3 – 1/2 way down.
Do steps 6 and 7 with the next 2 pleats. Verify front piece is the same size as front yoke. Baste pleats in place.
Repeat for other front piece.
Right sides together, sew front pieces to front yokes. Make sure you are lining up the correct front to the correct yoke (left to left, right to right, center seam to center seam, and side seam to side seam.) Serge or zig-zag raw edges.
Gather back piece. If you know how to do this, skip to step 15. This is how I gather: I typically like using my cording foot and a cord (or fishing line) to gather. If possible, lower your upper tension (I do a 3), set stitch to the widest setting (I do a 5), set the stitch length to the longest setting (I do a 4), and use a zig zag stitch. Tie a knot one end of the cord, slide cord onto cording foot, and place in center notch, ensuring to leave a cord tail. Wrong side facing up, sew a zig zag stitch ⅜” from the edge of the fabric (do not back stitch at either start nor end!). Do not sew through the cord. Leave a long thread tail.
Lightly pull the cord toward you while pushing fabric away from you, you should start seeing the fabric gather nicely!
Holding both ends of the cord, gather fabric the same length as the back yoke. Right sides together, pin gathers in place. I like using clips to hold the gathers and cord in place. By placing a clip at the beginning and end of the gathers and cord, I ensure the cord doesn’t move and my gathers remain the same length. If you don’t have clips or prefer to use pins, just make sure to pin REALLY WELL for the entire length.
Making sure the stitch settings are back to a straight stitch setting, sew pieces together (making sure to not sew through the gathering cord.) You can now take out the gathering cord and zig-zag stitch. I usually cut off the knot of the cord and pull it through. For the zig-zag, grab one thread and pull, it should come undone pretty easily. Finish edges with a serger/zig-zag stitch.
Iron sleeve hem. I like doing a double hem. Iron ¼”, fold and iron again at ¼” hem. Sew hem. Repeat for other sleeve.
Using same technique as back, gather right and left sleeves between dots.
Right sides together, sew sleeves onto gown. Pay attention to the front and back seam placement as the gathering is not centered on the sleeve. The gathering dots should line up with both yoke seams. Serge/zig-zag raw edges.
Right sides together, sew side seams. Serge/zig-zag raw edges.
Double hem bottom hem. Fold and iron ¼” and fold and iron again ¼”. Sew hem.
Serge or zig-zag center raw edges. If using zipper, fold both center edges ½”. Sew zipper towards the top center. The bottom portion of the gown does not close. I did not have zipper, so I used velcro. For the velcro, only one side gets folded ½” (which side? Depends on your preference).
I love saving money so I like cutting 1/2″ velcro down the middle so I have 1/4″ wide piece. I cut a 3″ long piece in half so I have (2) 1/4″ x 3″ pieces. 🙂 Leaving a 1″ gap between the velcro pieces, I have a 7″ enclosure area. You can use a full 7″ velcro pieces.
Using either ¼” or ½” velcro, sew rough velcro on unfolded side. Sew soft side to folded side at the same height/placement.
You are done with the gown!!!
CAP DIRECTIONS – (¼” seam allowance unless noted otherwise)
Cut a piece of cardboard 6″ x 6″. Since I used white fabric, my cardboard was visible, so I glued a piece of 6″ x 6″ paper to each side of cardboard using a glue stick (so there isn’t bumps from the glue.) If using dark fabric you can skip this part.
Center cardboard diagonally on the 10″ x 10″ piece of fabric. So, the cardboard corners are next to the fabric straight edges.
This should have white paper glued on it!
I like using a glue stick, but you can use some hot glue. Fold over one fabric corner towards the center of the cardboard. Glue corner point to cardboard.
Pay no attention to the bare cardboard 🙂
Fold over opposite corner. Fold point inwards so there is a fold in the middle of the cardboard. Glue edge down.
I swear it gets covered!
You should now have 2 points left. Fold over the fabric that is closest to the cardboard along the straight edge (do not fold onto cardboard.) Make sure the point remains centered.
Before folding over other side, fold down point to hide raw edges. Fold along straight edge again.
Now you can fold over that fabric onto cardboard. Hot glue center point first and glue sides next.
This was my first prototype, so it will look a little different, but it gets the point across.
Repeat steps 5-7 for other side. Set covered cardboard aside.
Again, prototype picture, yours shouldn’t overlap as much. Yay me for not taking adequate pics 😦
Headband construction: Right side together, sew side seams of main fabric. Repeat for lining. [For non-elastic option: If your doll has a lot of hair, you can sew the headband as is. If it is short hair or bald, I suggest trying the headband on now, if it is too loose, use a ½” hem instead of ¼”.]
Right sides together, sew bottom hem. Clip center point. Trim back seam allowance with pinking shears, if you have them 🙂
Turn inside out and iron seam.
If not using elastic, skip to next step. Turn headband inside out again. Place elastic within the bottom seam allowance on center hem – only pin on center. Starting from center to end, zig-zag the elastic in place – pull elastic taught as you sew (I use some tweezers to pull elastic.) Turn fabric and sew other end. Turn headband inside out again.
Ok, bare with me while I try to explain this next step. Right sides together, pin one curve to adjacent curve, sew from bottom of curve to about ¼” from top point of curve. Repeat with all curves. If done properly, the headband will now look like a cap 🙂 Finish raw edges to your choosing.
Turn headband around so raw edges are facing inside the cap. The top will now be flat. Place covered cardboard on surface with folded side up. Hot glue top of cap to the center of covered cardboard. Make sure front point of headband is facing a corner of the covered cardboard. When gluing down, make sure to glue from center out. Glue along the flat edges of the headband (it will naturally make straight edges.)
Optional: Cut a 3.5 inch circle of card stock (or 4 pieces of paper glued together.) Hot glue circle to inside of cap to hide raw edges. (This gives it more of that authentic cap look :D) Set aside.
Cut a piece of fabric twice the diameter of your button (so if using a 1″ button, cut a 2″ circle.) Because I used white fabric, I decided to use 2 pieces of fabric.
Using a handheld sewing needle, sew around the other edge of circle. (You can use a sewing machine as long as you stay close to the edge and sew a perfect-ish circle.)
Optional: If using batting, use a SMALL piece of batting between the button and fabric.
Place button (and if using, batting underneath button) right side down onto wrong side of fabric.
Pull thread to gather fabric around button.
Tie thread into a knot. Hot glue fabric opening onto button.
Hot glue covered button onto top center of cap. Make sure to only use a drop in the middle of the button and not the sides.
Tassel construction: Wrap embroidery floss width-wise around a pocket sized notebook 20 times. Do not take floss off of notebook. If you don’t have a notebook, you can use a 4″ piece of cardboard. Whatever you use, just make sure you end up with 20 pieces of 8″ embroidery floss.
Feed a 12″ piece of embroidery floss in between the notebook and wrapped floss.
Gently move loose floss to spine of book. Knot loose ends of 12″ floss. (Need a video? Watch my YouTube video HERE.)
Hide knot in between the wrapped floss. Make another knot to bind wrapped floss close to the book spine.
Slide floss off of the notebook. Cut wrapped floss on opposite side of knot, make sure the floss is taut as you cut.
With embroidery floss still folded in half (top of tassel), and the inside knot hidden, wrap a 20″ piece of embroidery floss about 1/2″ away from the top. Tie and hide the knot.
Wrap a piece of tape on the bottom of the tassel. Cut tassel straight at the tape. Remove the tape. Yay! The tassel is now complete!
DECORATE CAP
Time to decorate the cap!!! You can decorate the cap however you want! I decorated the cap using HTV (heat transfer vinyl). I cut the HTV with my Silhouette Cameo machine. I then used my small iron to iron the HTV onto the top of the cap.
You can decorate the cap with HTV, markers, glitter, puffy paint, regular paint, really anything works!
I realized while working on this pattern that I should start making videos (and posting videos) of my process. So, hopefully the blog will feature more YouTube videos. Stay tuned!!
Hi Everyone! Sorry for the delay in posts. Today’s post is an update, with some sneak peaks of what the next pattern blogs will be (yes, free patterns!!) You excited? I’m excited!
Can you believe it’s almost June?!?! Where is the time going? We have all been in quarantine, practicing social distancing, and doing the best we can! Among those things, is making adult and child sized masks. (Have you checked out the 18 inch doll face mask I made HERE?!?!)
In case anyone is wondering, for the adult and child size masks, I used THIS pattern by Craft Passion.
I had researched the best pattern and noticed this one was recommended by several hospital/medical centers. It is an easy sew. My niece, who has never sewed, was able to make this mask (with a little guidance from her aunt through FaceTime 😉 ).
I have done masks with a filter pocket and no pocket, and with a nose wire channel. Honestly, either works, just make sure you account for the tie material. If you are using a thicker material, such as ¼” and larger elastic, definitely cut the pattern appropriately as marked.
Another thing I have been doing is a cooking competition with my sisters! We are nowhere near being professional chefs (nor photographers), but it has been fun trying new recipes and revisiting older recipes we had forgotten about. We begin each competition with a selfie with our ingredients 🙂
Here are some of the things we have made! Don’t they look delicious?!
Empanadas: The closest thing I can describe them to are mini calzones with Mexican/Latin flavors. We made savory flavored ones.
Conchas: Mexican sweet bread with a shell shaped sugar topping. I made chocolate and vanilla flavored ones. I made mine shaped like Mickey heads!
The greatest tip/trick I have picked up? Use the sun to help rise your dough!!
Rise, baby, RISE!
Second most important thing? Make sure you use a large enough bowl!
My sister, trying out the proof setting on her new fancy toaster oven.
Churros: Deep fired dough coated in sugar (and/or cinnamon sugar). Yeah, this was one of those recipes that didn’t work well for me….
But my sister had a hit!
One of my favorite recipes was a (faux) alfredo sauce with homemade pasta! Being a lactose-free household, I had to get creative!
Doesn’t that look delicious??!! There is no dairy in this! It is a cashew based sauce and it was delicious! Find the sauce recipe HERE.
I must admit, I did use a hand crank pasta maker and my sisters gave me grief for it 😀 We used THIS recipe. I used the all-purpose flour version and it came out great. It does call for a lot of egg and we had a few difficulties getting the dough to come out. I ended up adding more water and a little more oil, my sisters, instead, added more egg and this was a mistake for them. Definitely go my route and add more water/oil than egg. It will be very eggy otherwise, my sisters didn’t eat theirs.
OK OK, I will stop with the food 🙂 But….. I really REALLY need to showcase this one. It is a copycat recipe, Creamy Chicken and Wild Rice soup in a bread bowl…. all handmade. Isn’t this delicious!?!?! This was a success for all of us 🙂
Just look at that bread… look at that soup… delicious. This was my sister’s. She made her’s to be more French baguette than Italian bread.
Look at this one!!! Look at that crunch.. you can see it… almost taste it…
This was mine, and it was truly delicious and perfect. The best part? Yep, lactose free!!!! I used THIS recipe for the soup and THIS recipe for the bread bowls and substituted the dairy for lactose free alternatives such as vegan butter and lactose free milk. I used a rotisserie chicken and a wild rice blend. I was afraid since I didn’t use a package rice blend, the rice wouldn’t cook all the way, but it ended up being perfect in the recipe as is. I also didn’t need to blend the soup, it was nice and thick on its own (so thick that I had to add extra stock to the leftovers the next day).
And in case you are curious, I used all my vegetable scraps and rotisserie chicken bones to make a chicken broth in my Instant Pot.
OK, I am done with food.. for now 😉
Going back to crafting!
I have always loved art and I consider myself an artist, whether it be painting, sewing, paper crafting, or LEGO building. I have compiled several “How To’s” over the years that I would love to blog about, but I have not had enough time! I will continue to post about sewing and doll clothes, but I will start blogging about other crafts as well! If there is something you are interested about, please let me know and I will try to blog about it (if I haven’t already written the blog out in my head!).
For the time being, my next few blogs will be doll clothes. One will be about “dolly and me” matching aprons! And yes, these two will be free patterns!!!!
Look at how cute and adorable those are! Both the kid and doll apron have functioning pockets! My nephew and niece NEEDED aprons and I NEEDED to make matching ones for their dolls 🙂
The next post (and most likely will be this week) is a Graduation Cap and Gown for the 18″ dolls.
Look at how adorable this is!!!!!
This took me over a WEEK to perfect. The most difficult part was the cap! I went through several versions until I found the perfect one!
Best part? (Even though several family members think I’m crazy for doing it considering the time it has taken me) I will be giving this pattern for free for the time being!!!! Yes, the gown, yes the cap, yes the tassel (you have to have a tassel!) and yes the cap design in both SVG and Silhouette Studio version! Call me crazy 🙂
So stay tuned! Follow my blog to receive an email to ensure you won’t miss this amazing pattern!
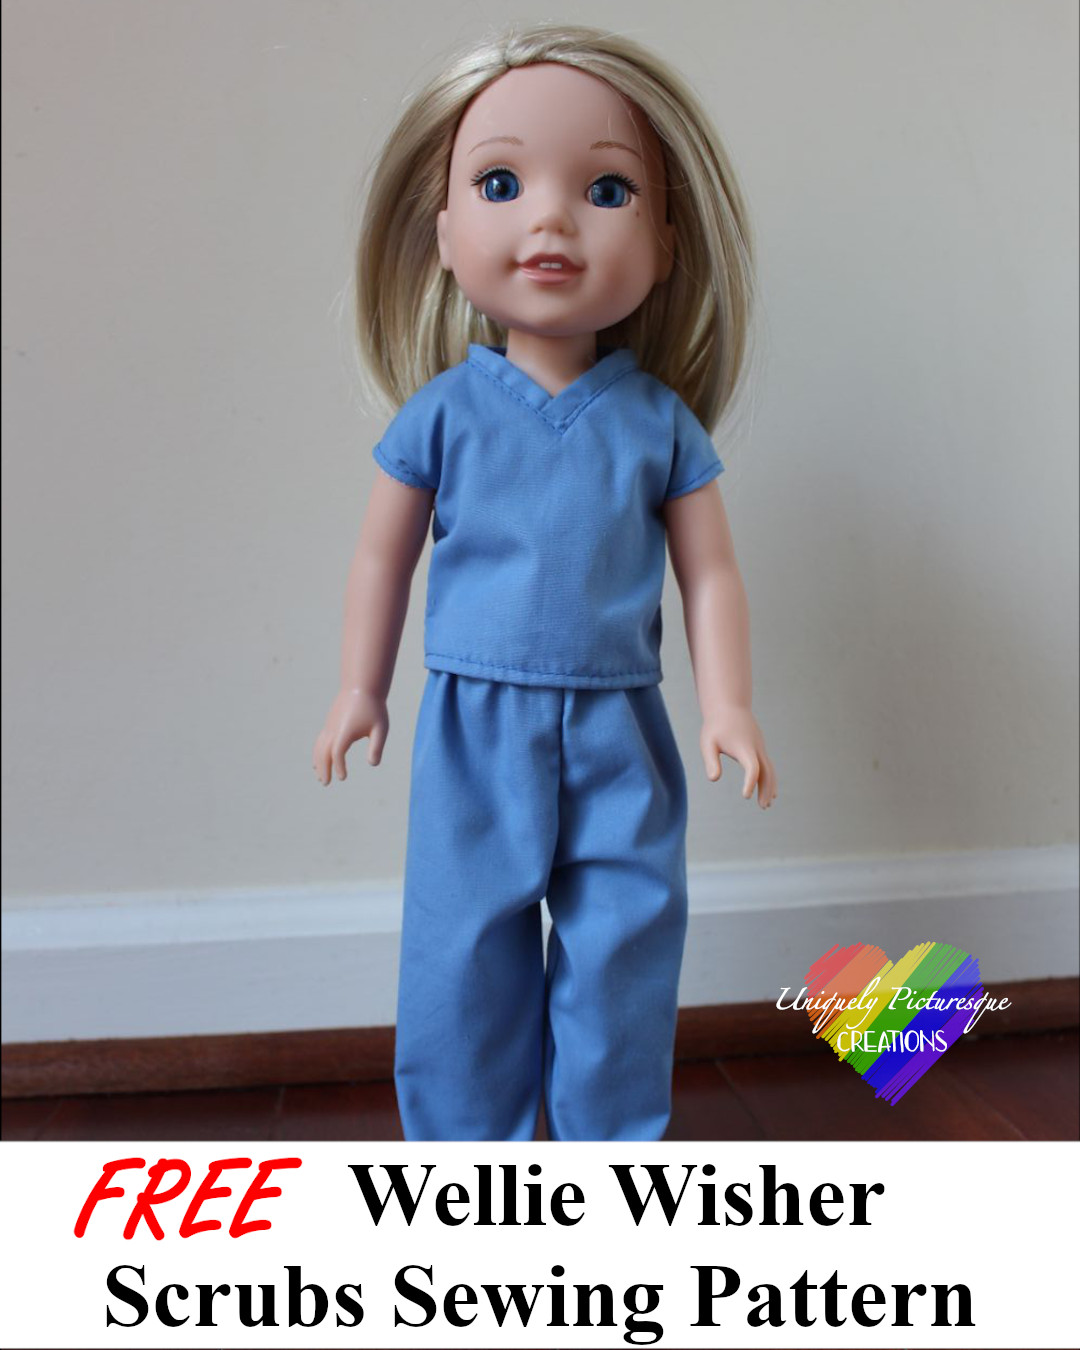
Hi Everyone!! I will be going back and continuing with some medical related clothing. Today I decided to try doing a scrubs outfit for the Wellie Wishers. I made scrubs for the 18″ inch dolls HERE and loved the way they came out, so it was only fitting to make some for the smaller dolls.
I ended up taking two different patterns and making one complete outfit 🙂 Both patterns come from Wren*Feathers. If you haven’t had a chance, go check out the blog!
For the top, I ended up using THIS dress pattern and only using the bodice. I omitted the collar and made the front into a v-neck. I added a neck band in the same way I did for the 18″ dolls HERE.
You will also need about 6.5″ of ¼” elastic for the pant waist.
SEWING
On the front bodice, measure about ¾” from the middle of neck. Make a line from this point to the collar (as shown in red below). Cut pattern at this new line. Cut your fabric on the fold.
2. Sew (and serge/zig-zag) front and back pieces at the shoulder seams ¼”.
3. Attach the neck pieces the same way I did HERE.
4. Serge/zig-zag sleeve/arm hole area. Iron sleeves inward ¼” and sew.
5. Right sides together, sew sides with a ¼” seam. At the sleeves, follow the curve of the pattern piece. Serge/zig-zag raw edges.
6. Serge/zig-zag bottom and back raw edges. Iron bottom hem inwards ¼” and sew.
7. Iron one back piece ¼” inward and sew the soft piece of velcro. Sew the rough velcro directly on the other back piece without folding fabric.
8. For the pants, cut fabric per pattern. I always like to label the front and back of the pants within the hem allowance. I usually write a “F” for front and “B” for back.
9. Right sides together, sew (and serge/zig-zag) the front crotch.
10. Open pants and serge/zig-zag waist. Fold waist down ⅜” and sew, leave enough casing room for the ¼” elastic.
11. Insert elastic into casing.
12. With right sides together, sew (and serge/zig-zag) back crotch area.
13. Serge/zig-zag leg hems. Turn inward ¼” and sew.
14. Open pants and sew leg opening. Serge/zig-zag ends.